Setup an usability test (old)
Usability testing is not difficult. Below you can find a step by step instruction to set up a usability lab by yourself. Use the suitcase for all the required hardware and software. In there you’ll find this step by step manual as well.
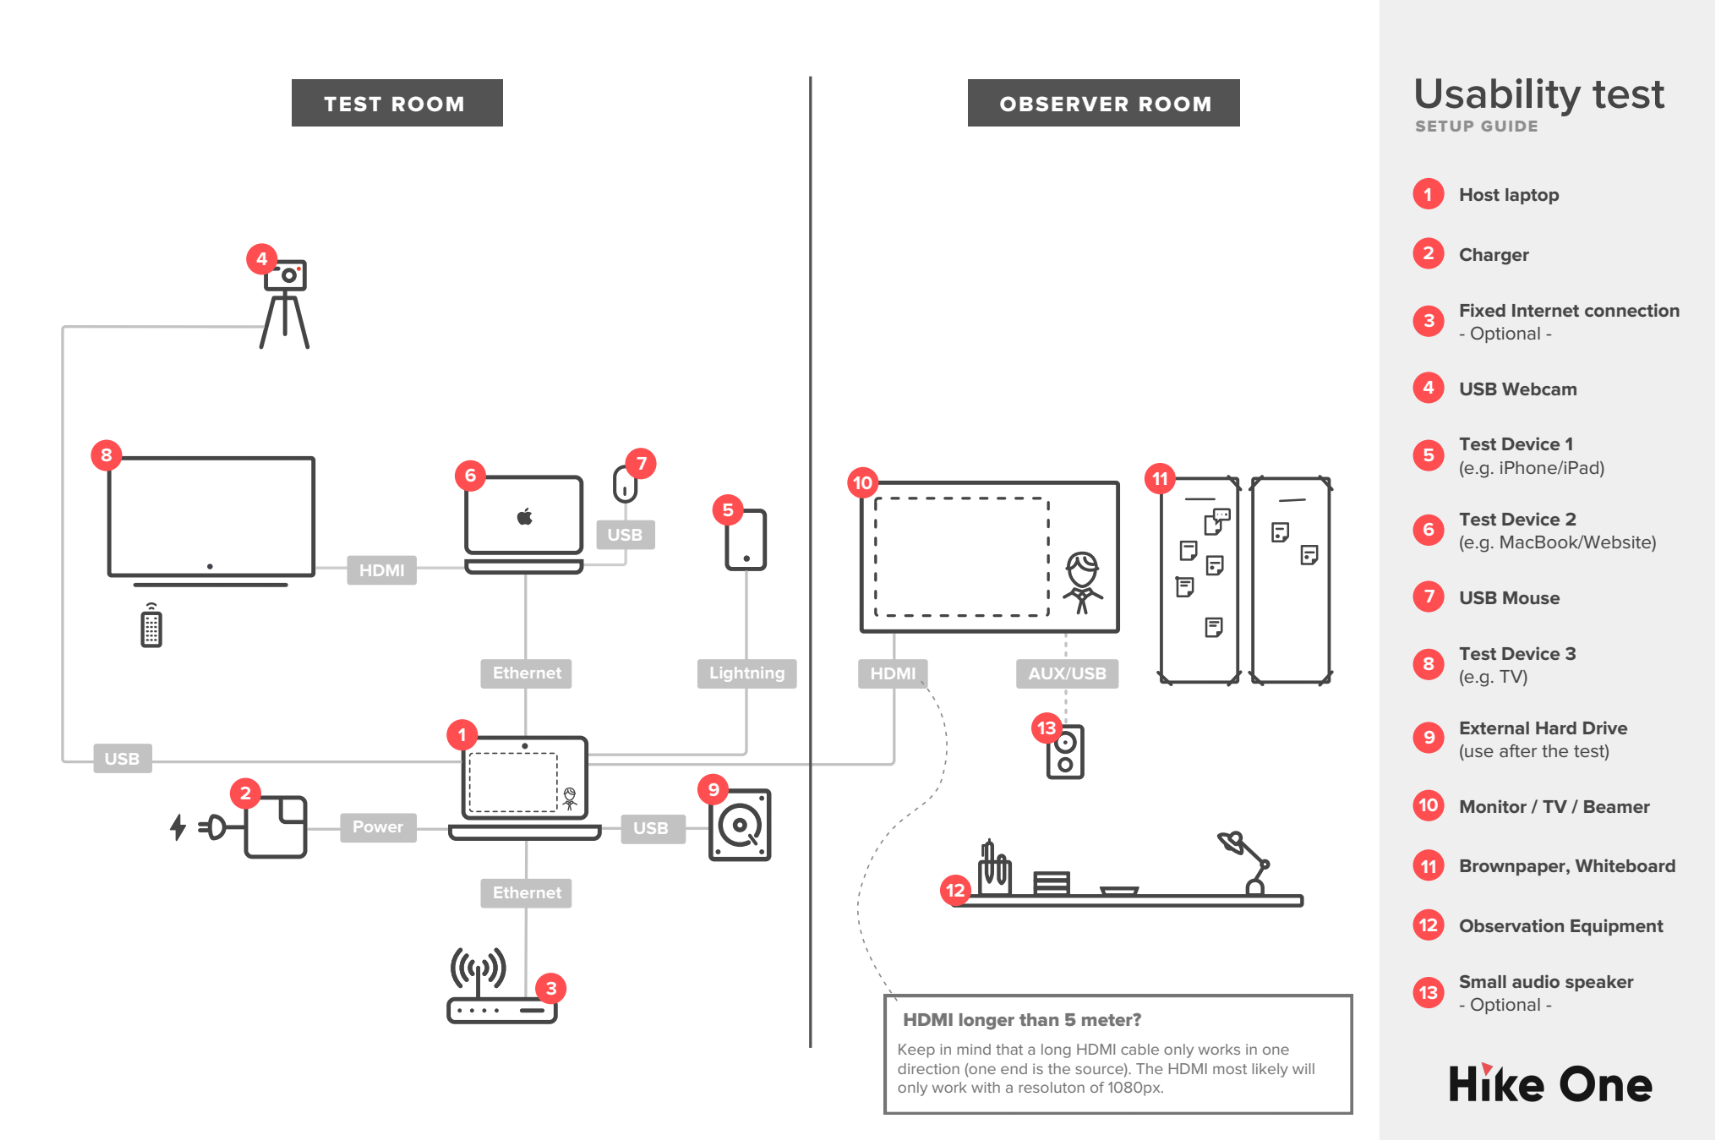
Step 1. Getting Started
Place the host laptop (1) somewhere not too visible for the participant, but not too far from your test device(s).
Step 2. Keep it powered
Always keep the host laptop (1) charged.
Step 3. Skype & fixed internet connection
Optional to share the screen of the host laptop via Skype to let stakeholders join the test from other locations. Because wifi is not trustworthy enough, use an ethernet cable (3).
Step 4. Put the webcam (4) in place
Place the webcam in front or a little sideways of a participants seating place. Connect it via an extended usb cable to the host laptop (1).Open photobooth to see the webcams image. Place it in the right bottom corner.
Step 5. Setting up an iPhone or iPad
Connect the device (5)with a lightning cable to the host laptop (1).To see the screen of the iPhone/iPad on the host laptop, please do the following:
- Open Quicktime
- Select File > New Movie Recording
- Select the device from the menu next to the record button

- Allow Permission on the device
Step 6. Setting up a test laptop
Connect the device (6) with an ethernet cable (Thunderboltconnector) to the host laptop (1).
- Go to System Preferences > Sharing > Choose screensharing > Select ‘Allusers’. Select ‘Computersettings..’ >‘ Anyonemay request to control the screen’.

- Go to Finder on the host laptop. Select the test device in the menu (left). Select ‘ShareScreen’ > By requesting permission.

- On the test device, select ‘Sharescreen’ in the Share screen request modal.

Pro Tips:
- Prevent your laptop from sleeping automatically by installing the ‘Caffeine’ app or disabling it in: Preferences > Energy Saver > Turn display off after: ‘Never’
- Connect a mouse to the test laptop(7).
- You could connect the test laptop (ifpossible) to a charger as well.
- Turn off natural scrolling (Preferences> Trackpad > Deselect ‘Scrolldirection: natural’) and other typical ‘Mac’ options, to make sure that the user uses functionalities that they are fimiliar with.
Step 7. Connecting the test device to the host laptop:
- On the host laptop(1)select the binocular icon in the window of the screen share.

• Place the shared screen next to the webcams image. Make it as big as possible(itcould overlap the webcams image a little, but make sure you still see the face of the participant.

Pro tip:
- Change views on the host laptop when switching from test device 1 and 2 (phone/tablet to MacBook) with your participant, so the right screen will be mirrored to the observation room..
Step 8. Setting up a television
If you us a TV (8) for a prototype (useour Protoid prototyping tool), connect it through HDMI to the laptop test device (6).Open the URL of the prototype on the laptop and open it in fullscreen. The host laptop shows that screen as well.
Step 9. Record video & sound
The app ‘Screenflow’is a great app for recording your screen. To start your new recording select ‘File’ > New. It’s important to select the audio input from the USB Webcam, as the sound quality is much better than the one your MacBook. Press ‘Startrecord’. Don’t forget to stop the record after interviewing (right top controls of your MacBook). In some cases you might want to ask the participant to sign a confidentiality agreement. If you do so, record that action with Screenflow as well.
Step 10. Monitoring the users
To see what’s happening in the usability test room we need to connect the host laptop with a monitor/TV/Beamer (10) in the observation room. Connect the host laptop via an HDMI cable. Again, this is more trustworthy than using wifi. We provide a 30m HDMI cable in the suitcase. Check if the client has a TV with HDMI input. Otherwise, take the beamer along with you from Hike One. To hear better sound, open ‘Lookback’ on the host laptop. In that way everyone can here the sound of the mic of the USB webcam, which is much better than the built-in mic on the MacBook.
Step 11. Collecting the data
Provide sharpies, post its (onecolor per participant) and stickers (12).
Step 12. Put it on the wall
If there’s no whiteboard, put the brown paper on the wall, in seperate strokes (participants) and rows (tasks) (11).
Step 13. Saving the videos & wrapping it up
Stop the screenrecord of the interview (if you use Screenflow, close the window first and then press on save, this is much faster than first choosing save). After all interviews of the day: cut and paste all the saved screenflows on to an external hard drive (9) which is included in the suitcase. Export the interviews from Screenflow the next day from the HD to your laptop (you can upload the video’s in the ‘Archive’ folder in Dropbox) and refill the suitcase with some fresh post.